Introduction
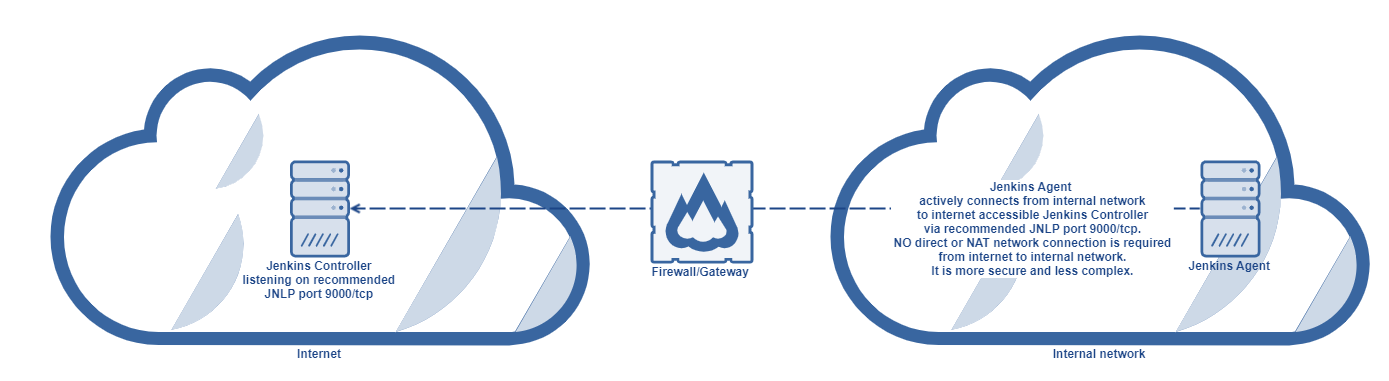
Usually, Jenkins controller and Jenkins agent are located in the same network, therefore it is quite easy to adopt Jenkins agents using SSH. This time we will talk about the situation when Jenkins controller and bunch of other DevOps tools are running in "network A" and Jenkins agents are running in "network B". Quite often connections from A to B are rejected, however, connections from B to A are accepted. There might be various reasons, in general, network B has elevated security expectations. The typical setup is Jenkins controller located in public cloud and Jenkins agent(s) located in a private customer network. Private customer network might be needed in such because some sort of higher data privacy requirements must be matched or some specialised hardware is present in customer premises and it cannot be accessible directly from the public internet.
Solution
The recommended solution is controller/agent setup, when the controller runs in a public environment and agent is running on a server located in a private network. The agent is also called "on-premise executor" (OPE). Jobs are then performing jobs/tasks on such agent in internal/private networks. Jenkins Agent has an active connection from the internal network to internet accessible Jenkins Master via recommended JNLP port tcp/9000 and keeps listening to builds/jobs. Port can be changed, but we will keep talking about 9000. NO direct or NAT network connection is required from the internet to internal network. It is a secure and simple solution.
Requirements
Network
- firewall opening for port 9000/tcp from relevant source agent(s) IP(s) or network segment/pool towards internet in general (sometimes referred as destination )
- network layer (using TDS portal network functionality)
- operating system layer (firewalld if needed)
Jenkins controller running in public
- Decide which port you are going to use as we use fixed setup in our case. We are choosing 9000 in this guide.
- Make sure to have TCP port 9000 opened:
- on network/firewall layer - Firewall
- firewall opening for port 9000/tcp from relevant source agent(s) IP(s) or network(s)
in OS level, for example firewalld:
firewall-cmd --add-port=9000/tcp --permanent
firewall-cmd --reload
- on network/firewall layer - Firewall
- Listening on JNLP port tcp/9000
- Go to https://jenkins.xxx.tds.customerx.com/configureSecurity (remember to use correct URL of your Jenkins controller)
- Set "TCP port for inbound agents" to Fixed:9000
- Open "advanced" and choose "Inbound TCP Agent Protocol/4 (TLS encryption)" (deselect others if not relevant)
- node added according to the following steps
- Go to https://jenkins.xxx.tds.customerx.com/computer/new (remember to use correct URL of your Jenkins controller)
- Set "Node name" to relevant name useful for you
- Choose "Permanent"
- Set "Remote root directory" to "/home/jenkins-agent"
- Set "Launch method" to "Launch agent by connecting it to the controller" previously called "Launch agent via Java Web Start"
- Click "Save"
- now go to newly created node and copy secret/token for connecting agent
- Go to https://jenkins.xxx.tds.customerx.com/computer/XXX (remember to use correct URL of your Jenkins controller and replace XXX with the name of your node)
You will see something like:
Run from agent command line:

java -jar agent.jar -jnlpUrl https://jenkins.xxx.tds.customerx.com/computer/test/slave-agent.jnlp -secret 8b2911d98400bad5d45635b812b5f2e8e7c1d216bbbae9422a3ba57c691bf762 -workDir "/home/jenkins-agent"
Run from agent command line, with the secret stored in a file:

echo 8b2911d98400bad5d45635b812b5f2e8e7c1d216bbbae9422a3ba57c691bf762 > secret-file
java -jar agent.jar -jnlpUrl https://jenkins.xxx.tds.customerx.com/computer/test/slave-agent.jnlp -secret @secret-file -workDir "/home/jenkins-agent"
Please copy only the secret, which is for example in this case "8b2911d98400bad5d45635b812b5f2e8e7c1d216bbbae9422a3ba57c691bf762"
Jenkins agent node (slave) or so called on-premise executor
- This agent can be running on a server next to your Jenkins controller/master or in the internal network(s)
- agent service(s) with service auto-start to assure automatic re-connect to Jenkins controller at any time even after server reboot
- Install dependencies
CentOS
yum install java-11-openjdk-devel git -y
# you can install also other dependencies that will be required for your jobs
Ubuntu
apt-get update; apt-get install openjdk-11-jdk git -y
# you can install also other dependencies that will be required for your jobs
- Installing agent
Prepare a folder for config
mkdir -p /data/configs
mkdir -p /opt/jenkins-agent
Create service file /opt/jenkins-agent/jenkins-agent.service
jenkinsope.service[Unit] Description=Jenkins Agent - On Premise Executor Wants=network.target After=network.target [Service] # EnvironmentFile cannnot be used on Debian/Ubuntu anymore - Reference: https://github.com/varnishcache/pkg-varnish-cache/issues/24 # So we are using drop-in config /etc/systemd/system/jenkins-agent.service.d/local.conf ExecStart=/usr/bin/java -Xms${JAVA_MEMORY} -Xmx${JAVA_MEMORY} -jar /opt/jenkins-agent/agent.jar -jnlpUrl ${CONTROLLER_URL}/computer/${NODE_NAME}/jenkins-agent.jnlp -secret ${SECRET} -workDir "${WORK_DIR}" User=jenkins-agent Restart=always RestartSec=10 StartLimitInterval=0 [Install] WantedBy=multi-user.targetCreate config file /data/configs/jenkins-agent.conf
JAVA_MEMORY=512m
CONTROLLER_URL=https://jenkins.xxx.tds.customerx.com
NODE_NAME=XXX
SECRET=8b2911d98400bad5d45635b812b5f2e8e7c1d216bbbae9422a3ba57c691bf762
WORK_DIR=/home/jenkins-agent
Create script /opt/jenkins-agent/jenkins-agent-install
#!/bin/bash
AGENT_APP_HOME=/opt/jenkins-agent
SERVICE_USER=jenkins-agent
MAINCONFIG=/data/configs/jenkins-agent.conf
OLD_CONF=/data/configs/jenkinsope.conf
if [ -f $OLD_CONF ];then mv -f $OLD_CONF $MAINCONFIG;fi
source $MAINCONFIG
OLD_USER=jenkinsope
OLD_HOME=/home/$OLD_USER
if [ -d $OLD_HOME ];then
  sed -i 's#^WORK_DIR.*#WORK_DIR=/home/jenkins-agent#g' $MAINCONFIG
  sed -i 's#^MASTER_URL#CONTROLLER_URL#g' $MAINCONFIG
  source $MAINCONFIG
  # Stopping old service
  systemctl stop jenkinsope
  sleep 10
  mv $OLD_HOME $WORK_DIR
  userdel -rf $OLD_USER
  rm -rf /etc/systemd/system/jenkins-agent.service.d
  rm -f /usr/lib/systemd/system/jenkinsope.service
fi
useradd -m -s /bin/bash $SERVICE_USER 2> /dev/null
mkdir -p $WORK_DIR/.ssh
chmod 700 $WORK_DIR/.ssh
touch $WORK_DIR/.ssh/config
chmod 600 $WORK_DIR/.ssh/*
echo "Changing ownership of home/work folder ($WORK_DIR) and its content (can take long time with many files)..."
chown $SERVICE_USER:$SERVICE_USER -R $WORK_DIR
curl -s ${CONTROLLER_URL}/jnlpJars/agent.jar -o $AGENT_APP_HOME/agent.jar
chmod 644 $AGENT_APP_HOME/agent.jar
install -D -m 644 $AGENT_APP_HOME/jenkins-agent.service /usr/lib/systemd/system/jenkins-agent.service
mkdir -p /etc/systemd/system/jenkins-agent.service.d
echo "[Service]" > /etc/systemd/system/jenkins-agent.service.d/local.conf
sed 's#^#Environment=#g' $MAINCONFIG >> /etc/systemd/system/jenkins-agent.service.d/local.conf
systemctl daemon-reload
systemctl restart jenkins-agent
systemctl enable jenkins-agent
systemctl status jenkins-agent
echo "0 4 * * * root $AGENT_APP_HOME/jenkins-agent-install" > /etc/cron.d/jenkins-agent-update
Run install script
chmod +x /opt/jenkins-agent/jenkins-agent-install
/opt/jenkins-agent/jenkins-agent-install
- Uninstalling agent (for cleanup purposes or if you messed up something)
Create script /opt/jenkins-agent/jenkins-agent-uninstall
systemctl disable jenkins-agent
systemctl stop jenkins-agent
rm -f /usr/lib/systemd/system/jenkins-agent.service
rm -rf /etc/systemd/system/jenkins-agent.service.d
systemctl daemon-reload
userdel -r jenkins-agent
rm -rf /home/jenkins-agent
Run install script
chmod +x /opt/jenkins-agent/jenkins-agent-uninstall
/opt/jenkins-agent/jenkins-agent-uninstall
- Install dependencies
Inspired by
- service itself - https://github.com/jenkinsci/systemd-slave-installer-module/blob/master/src/main/resources/org/jenkinsci/modules/systemd_slave_installer/jenkins-slave.service
- service parameters/options - https://gist.github.com/dragolabs/05dfe1c0899221ce51204dbfe7feecbb
- way of service installing - https://gist.github.com/michaelneale/9635744
Updating Jenkins agent to new setup
Steps:
Run script on Jenkins agent:
systemctl stop jenkins-agent
systemctl disable jenkins-agent

mkdir -p /data
if [ ! -d /data/jenkins-agent ] && [ -d /home/jenkins-agent ];then mv /home/jenkins-agent /data/jenkins-agent; else echo "Agent data are either already migrated or not present at all, please check it properly!"; sleep 10;done

id jenkins-agent
usermod -u 900 jenkins-agent
groupmod -g 900 jenkins-agent

chown jenkins-agent:jenkins-agent -R /data/jenkins-agent
It applies following changes- stop jenkins agent
- move data to new location
- move /op/jenkins-agent into new location
- update jenkins agent user ID
- change ownership of jenkins agent files to jenkins agent to reflect new user ID
update registered agents in Jenkins to use new path
We do this step manually in this example. It can be automated if you have many agents or if you want to apply it on all agents at once.
- Go to https://jenkins.xxx.tds.customerx.com/manage/computer/
- Select affected agent >> Configure
- Set "Remote root directory" to "/data/jenkins-agent"
- Click "Save"
- Then continue with standard agent setup according to